Model Gemini dibangun dari awal untuk mendukung multimodalitas, sehingga dapat menyelesaikan berbagai tugas pemrosesan gambar dan computer vision, termasuk, tetapi tidak terbatas pada, pemberian teks gambar, klasifikasi, dan menjawab pertanyaan visual tanpa harus melatih model ML khusus.
Selain kemampuan multimodal umumnya, model Gemini menawarkan akurasi yang ditingkatkan untuk kasus penggunaan tertentu seperti deteksi objek dan segmentasi, melalui pelatihan tambahan.
Meneruskan gambar ke Gemini
Anda dapat memberikan gambar sebagai input ke Gemini menggunakan dua metode:
- Meneruskan data gambar inline: Ideal untuk file yang lebih kecil (ukuran total permintaan kurang dari 20 MB, termasuk perintah).
- Mengupload gambar menggunakan File API: Direkomendasikan untuk file yang lebih besar atau untuk menggunakan kembali gambar di beberapa permintaan.
Meneruskan data gambar inline
Anda dapat meneruskan data gambar inline dalam
permintaan ke generateContent. Anda dapat menyediakan data gambar sebagai string
berenkode Base64 atau dengan membaca file lokal secara langsung (bergantung pada bahasa).
Contoh berikut menunjukkan cara membaca gambar dari file lokal dan meneruskannya ke generateContent API untuk diproses.
Python
  from google import genai
  from google.genai import types

  with open('path/to/small-sample.jpg', 'rb') as f:
      image_bytes = f.read()

  client = genai.Client()
  response = client.models.generate_content(
    model='gemini-3-flash-preview',
    contents=[
      types.Part.from_bytes(
        data=image_bytes,
        mime_type='image/jpeg',
      ),
      'Caption this image.'
    ]
  )

  print(response.text)
JavaScript
import { GoogleGenAI } from "@google/genai";
import * as fs from "node:fs";

const ai = new GoogleGenAI({});
const base64ImageFile = fs.readFileSync("path/to/small-sample.jpg", {
  encoding: "base64",
});

const contents = [
  {
    inlineData: {
      mimeType: "image/jpeg",
      data: base64ImageFile,
    },
  },
  { text: "Caption this image." },
];

const response = await ai.models.generateContent({
  model: "gemini-3-flash-preview",
  contents: contents,
});
console.log(response.text);
Go
bytes, _ := os.ReadFile("path/to/small-sample.jpg")

parts := []*genai.Part{
  genai.NewPartFromBytes(bytes, "image/jpeg"),
  genai.NewPartFromText("Caption this image."),
}

contents := []*genai.Content{
  genai.NewContentFromParts(parts, genai.RoleUser),
}

result, _ := client.Models.GenerateContent(
  ctx,
  "gemini-3-flash-preview",
  contents,
  nil,
)

fmt.Println(result.Text())
REST
IMG_PATH="/path/to/your/image1.jpg"

if [[ "$(base64 --version 2>&1)" = *"FreeBSD"* ]]; then
B64FLAGS="--input"
else
B64FLAGS="-w0"
fi

curl "https://generativelanguage.googleapis.com/v1beta/models/gemini-3-flash-preview:generateContent" \
-H "x-goog-api-key: $GEMINI_API_KEY" \
-H 'Content-Type: application/json' \
-X POST \
-d '{
    "contents": [{
    "parts":[
        {
            "inline_data": {
            "mime_type":"image/jpeg",
            "data": "'"$(base64 $B64FLAGS $IMG_PATH)"'"
            }
        },
        {"text": "Caption this image."},
    ]
    }]
}' 2> /dev/null
Anda juga dapat mengambil gambar dari URL, mengonversinya ke byte, dan meneruskannya ke
generateContent seperti yang ditunjukkan dalam contoh berikut.
Python
from google import genai
from google.genai import types

import requests

image_path = "https://goo.gle/instrument-img"
image_bytes = requests.get(image_path).content
image = types.Part.from_bytes(
  data=image_bytes, mime_type="image/jpeg"
)

client = genai.Client()

response = client.models.generate_content(
    model="gemini-3-flash-preview",
    contents=["What is this image?", image],
)

print(response.text)
JavaScript
import { GoogleGenAI } from "@google/genai";

async function main() {
  const ai = new GoogleGenAI({});

  const imageUrl = "https://goo.gle/instrument-img";

  const response = await fetch(imageUrl);
  const imageArrayBuffer = await response.arrayBuffer();
  const base64ImageData = Buffer.from(imageArrayBuffer).toString('base64');

  const result = await ai.models.generateContent({
    model: "gemini-3-flash-preview",
    contents: [
    {
      inlineData: {
        mimeType: 'image/jpeg',
        data: base64ImageData,
      },
    },
    { text: "Caption this image." }
  ],
  });
  console.log(result.text);
}

main();
Go
package main

import (
  "context"
  "fmt"
  "os"
  "io"
  "net/http"
  "google.golang.org/genai"
)

func main() {
  ctx := context.Background()
  client, err := genai.NewClient(ctx, nil)
  if err != nil {
      log.Fatal(err)
  }

  // Download the image.
  imageResp, _ := http.Get("https://goo.gle/instrument-img")

  imageBytes, _ := io.ReadAll(imageResp.Body)

  parts := []*genai.Part{
    genai.NewPartFromBytes(imageBytes, "image/jpeg"),
    genai.NewPartFromText("Caption this image."),
  }

  contents := []*genai.Content{
    genai.NewContentFromParts(parts, genai.RoleUser),
  }

  result, _ := client.Models.GenerateContent(
    ctx,
    "gemini-3-flash-preview",
    contents,
    nil,
  )

  fmt.Println(result.Text())
}
REST
IMG_URL="https://goo.gle/instrument-img"

MIME_TYPE=$(curl -sIL "$IMG_URL" | grep -i '^content-type:' | awk -F ': ' '{print $2}' | sed 's/\r$//' | head -n 1)
if [[ -z "$MIME_TYPE" || ! "$MIME_TYPE" == image/* ]]; then
  MIME_TYPE="image/jpeg"
fi

# Check for macOS
if [[ "$(uname)" == "Darwin" ]]; then
  IMAGE_B64=$(curl -sL "$IMG_URL" | base64 -b 0)
elif [[ "$(base64 --version 2>&1)" = *"FreeBSD"* ]]; then
  IMAGE_B64=$(curl -sL "$IMG_URL" | base64)
else
  IMAGE_B64=$(curl -sL "$IMG_URL" | base64 -w0)
fi

curl "https://generativelanguage.googleapis.com/v1beta/models/gemini-3-flash-preview:generateContent" \
    -H "x-goog-api-key: $GEMINI_API_KEY" \
    -H 'Content-Type: application/json' \
    -X POST \
    -d '{
      "contents": [{
        "parts":[
            {
              "inline_data": {
                "mime_type":"'"$MIME_TYPE"'",
                "data": "'"$IMAGE_B64"'"
              }
            },
            {"text": "Caption this image."}
        ]
      }]
    }' 2> /dev/null
Mengupload gambar menggunakan File API
Untuk file besar atau agar dapat menggunakan file gambar yang sama berulang kali, gunakan
Files API. Kode berikut mengupload file gambar, lalu menggunakan file tersebut dalam
panggilan ke generateContent. Lihat panduan Files API untuk
mengetahui informasi dan contoh selengkapnya.
Python
from google import genai

client = genai.Client()

my_file = client.files.upload(file="path/to/sample.jpg")

response = client.models.generate_content(
    model="gemini-3-flash-preview",
    contents=[my_file, "Caption this image."],
)

print(response.text)
JavaScript
import {
  GoogleGenAI,
  createUserContent,
  createPartFromUri,
} from "@google/genai";

const ai = new GoogleGenAI({});

async function main() {
  const myfile = await ai.files.upload({
    file: "path/to/sample.jpg",
    config: { mimeType: "image/jpeg" },
  });

  const response = await ai.models.generateContent({
    model: "gemini-3-flash-preview",
    contents: createUserContent([
      createPartFromUri(myfile.uri, myfile.mimeType),
      "Caption this image.",
    ]),
  });
  console.log(response.text);
}

await main();
Go
package main

import (
  "context"
  "fmt"
  "os"
  "google.golang.org/genai"
)

func main() {
  ctx := context.Background()
  client, err := genai.NewClient(ctx, nil)
  if err != nil {
      log.Fatal(err)
  }

  uploadedFile, _ := client.Files.UploadFromPath(ctx, "path/to/sample.jpg", nil)

  parts := []*genai.Part{
      genai.NewPartFromText("Caption this image."),
      genai.NewPartFromURI(uploadedFile.URI, uploadedFile.MIMEType),
  }

  contents := []*genai.Content{
      genai.NewContentFromParts(parts, genai.RoleUser),
  }

  result, _ := client.Models.GenerateContent(
      ctx,
      "gemini-3-flash-preview",
      contents,
      nil,
  )

  fmt.Println(result.Text())
}
REST
IMAGE_PATH="path/to/sample.jpg"
MIME_TYPE=$(file -b --mime-type "${IMAGE_PATH}")
NUM_BYTES=$(wc -c < "${IMAGE_PATH}")
DISPLAY_NAME=IMAGE

tmp_header_file=upload-header.tmp

# Initial resumable request defining metadata.
# The upload url is in the response headers dump them to a file.
curl "https://generativelanguage.googleapis.com/upload/v1beta/files" \
  -H "x-goog-api-key: $GEMINI_API_KEY" \
  -D upload-header.tmp \
  -H "X-Goog-Upload-Protocol: resumable" \
  -H "X-Goog-Upload-Command: start" \
  -H "X-Goog-Upload-Header-Content-Length: ${NUM_BYTES}" \
  -H "X-Goog-Upload-Header-Content-Type: ${MIME_TYPE}" \
  -H "Content-Type: application/json" \
  -d "{'file': {'display_name': '${DISPLAY_NAME}'}}" 2> /dev/null

upload_url=$(grep -i "x-goog-upload-url: " "${tmp_header_file}" | cut -d" " -f2 | tr -d "\r")
rm "${tmp_header_file}"

# Upload the actual bytes.
curl "${upload_url}" \
  -H "x-goog-api-key: $GEMINI_API_KEY" \
  -H "Content-Length: ${NUM_BYTES}" \
  -H "X-Goog-Upload-Offset: 0" \
  -H "X-Goog-Upload-Command: upload, finalize" \
  --data-binary "@${IMAGE_PATH}" 2> /dev/null > file_info.json

file_uri=$(jq -r ".file.uri" file_info.json)
echo file_uri=$file_uri

# Now generate content using that file
curl "https://generativelanguage.googleapis.com/v1beta/models/gemini-3-flash-preview:generateContent" \
    -H "x-goog-api-key: $GEMINI_API_KEY" \
    -H 'Content-Type: application/json' \
    -X POST \
    -d '{
      "contents": [{
        "parts":[
          {"file_data":{"mime_type": "'"${MIME_TYPE}"'", "file_uri": "'"${file_uri}"'"}},
          {"text": "Caption this image."}]
        }]
      }' 2> /dev/null > response.json

cat response.json
echo

jq ".candidates[].content.parts[].text" response.json
Membuat perintah dengan beberapa gambar
Anda dapat memberikan beberapa gambar dalam satu perintah dengan menyertakan beberapa objek gambar
Part dalam array contents. Ini dapat berupa campuran data inline
(file lokal atau URL) dan referensi File API.
Python
from google import genai
from google.genai import types

client = genai.Client()

# Upload the first image
image1_path = "path/to/image1.jpg"
uploaded_file = client.files.upload(file=image1_path)

# Prepare the second image as inline data
image2_path = "path/to/image2.png"
with open(image2_path, 'rb') as f:
    img2_bytes = f.read()

# Create the prompt with text and multiple images
response = client.models.generate_content(

    model="gemini-3-flash-preview",
    contents=[
        "What is different between these two images?",
        uploaded_file,  # Use the uploaded file reference
        types.Part.from_bytes(
            data=img2_bytes,
            mime_type='image/png'
        )
    ]
)

print(response.text)
JavaScript
import {
  GoogleGenAI,
  createUserContent,
  createPartFromUri,
} from "@google/genai";
import * as fs from "node:fs";

const ai = new GoogleGenAI({});

async function main() {
  // Upload the first image
  const image1_path = "path/to/image1.jpg";
  const uploadedFile = await ai.files.upload({
    file: image1_path,
    config: { mimeType: "image/jpeg" },
  });

  // Prepare the second image as inline data
  const image2_path = "path/to/image2.png";
  const base64Image2File = fs.readFileSync(image2_path, {
    encoding: "base64",
  });

  // Create the prompt with text and multiple images

  const response = await ai.models.generateContent({

    model: "gemini-3-flash-preview",
    contents: createUserContent([
      "What is different between these two images?",
      createPartFromUri(uploadedFile.uri, uploadedFile.mimeType),
      {
        inlineData: {
          mimeType: "image/png",
          data: base64Image2File,
        },
      },
    ]),
  });
  console.log(response.text);
}

await main();
Go
// Upload the first image
image1Path := "path/to/image1.jpg"
uploadedFile, _ := client.Files.UploadFromPath(ctx, image1Path, nil)

// Prepare the second image as inline data
image2Path := "path/to/image2.jpeg"
imgBytes, _ := os.ReadFile(image2Path)

parts := []*genai.Part{
  genai.NewPartFromText("What is different between these two images?"),
  genai.NewPartFromBytes(imgBytes, "image/jpeg"),
  genai.NewPartFromURI(uploadedFile.URI, uploadedFile.MIMEType),
}

contents := []*genai.Content{
  genai.NewContentFromParts(parts, genai.RoleUser),
}

result, _ := client.Models.GenerateContent(
  ctx,
  "gemini-3-flash-preview",
  contents,
  nil,
)

fmt.Println(result.Text())
REST
# Upload the first image
IMAGE1_PATH="path/to/image1.jpg"
MIME1_TYPE=$(file -b --mime-type "${IMAGE1_PATH}")
NUM1_BYTES=$(wc -c < "${IMAGE1_PATH}")
DISPLAY_NAME1=IMAGE1

tmp_header_file1=upload-header1.tmp

curl "https://generativelanguage.googleapis.com/upload/v1beta/files" \
  -H "x-goog-api-key: $GEMINI_API_KEY" \
  -D upload-header1.tmp \
  -H "X-Goog-Upload-Protocol: resumable" \
  -H "X-Goog-Upload-Command: start" \
  -H "X-Goog-Upload-Header-Content-Length: ${NUM1_BYTES}" \
  -H "X-Goog-Upload-Header-Content-Type: ${MIME1_TYPE}" \
  -H "Content-Type: application/json" \
  -d "{'file': {'display_name': '${DISPLAY_NAME1}'}}" 2> /dev/null

upload_url1=$(grep -i "x-goog-upload-url: " "${tmp_header_file1}" | cut -d" " -f2 | tr -d "\r")
rm "${tmp_header_file1}"

curl "${upload_url1}" \
  -H "Content-Length: ${NUM1_BYTES}" \
  -H "X-Goog-Upload-Offset: 0" \
  -H "X-Goog-Upload-Command: upload, finalize" \
  --data-binary "@${IMAGE1_PATH}" 2> /dev/null > file_info1.json

file1_uri=$(jq ".file.uri" file_info1.json)
echo file1_uri=$file1_uri

# Prepare the second image (inline)
IMAGE2_PATH="path/to/image2.png"
MIME2_TYPE=$(file -b --mime-type "${IMAGE2_PATH}")

if [[ "$(base64 --version 2>&1)" = *"FreeBSD"* ]]; then
  B64FLAGS="--input"
else
  B64FLAGS="-w0"
fi
IMAGE2_BASE64=$(base64 $B64FLAGS $IMAGE2_PATH)

# Now generate content using both images
curl "https://generativelanguage.googleapis.com/v1beta/models/gemini-3-flash-preview:generateContent" \
    -H "x-goog-api-key: $GEMINI_API_KEY" \
    -H 'Content-Type: application/json' \
    -X POST \
    -d '{
      "contents": [{
        "parts":[
          {"text": "What is different between these two images?"},
          {"file_data":{"mime_type": "'"${MIME1_TYPE}"'", "file_uri": '$file1_uri'}},
          {
            "inline_data": {
              "mime_type":"'"${MIME2_TYPE}"'",
              "data": "'"$IMAGE2_BASE64"'"
            }
          }
        ]
      }]
    }' 2> /dev/null > response.json

cat response.json
echo

jq ".candidates[].content.parts[].text" response.json
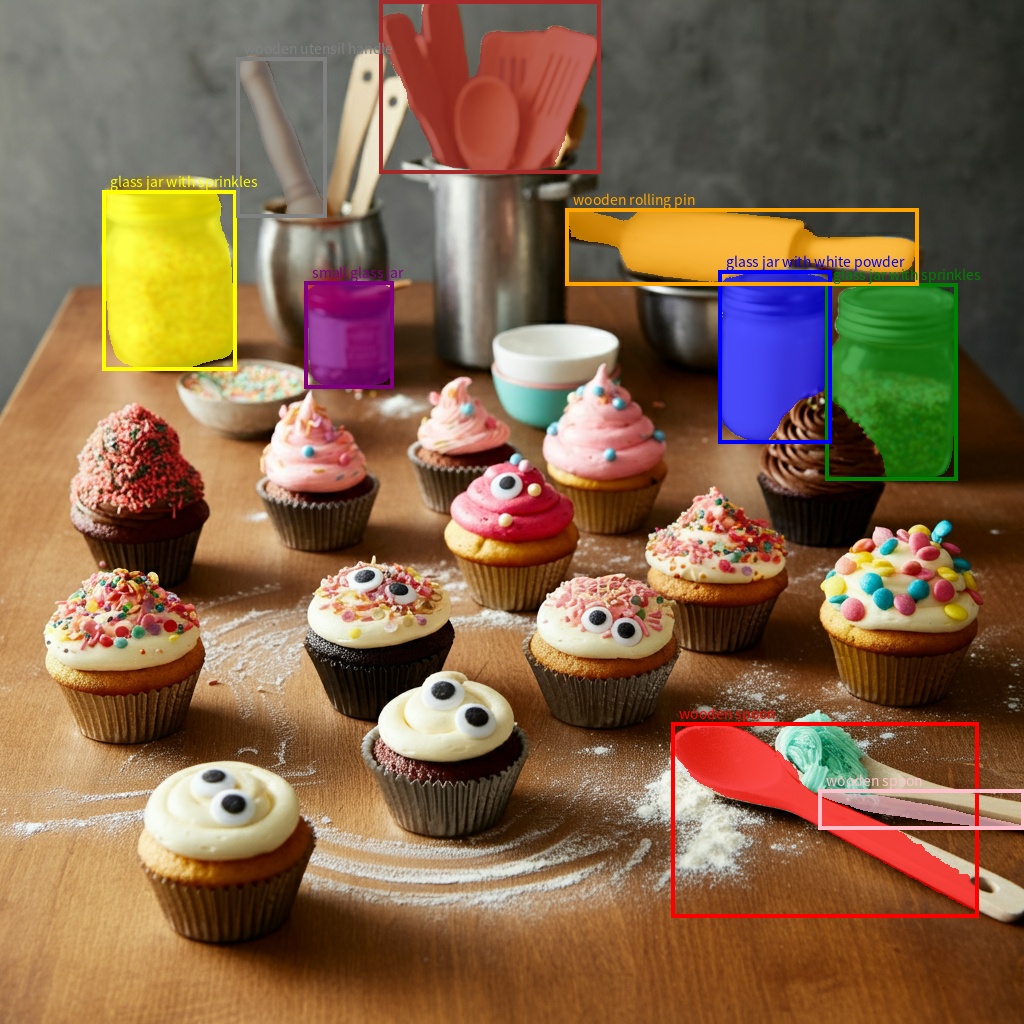
Deteksi objek
Model dilatih untuk mendeteksi objek dalam gambar dan mendapatkan koordinat kotak pembatasnya. Koordinat, relatif terhadap dimensi gambar, diskalakan ke [0, 1000]. Anda harus membatalkan penskalaan koordinat ini berdasarkan ukuran gambar asli Anda.
Python
from google import genai
from google.genai import types
from PIL import Image
import json

client = genai.Client()
prompt = "Detect the all of the prominent items in the image. The box_2d should be [ymin, xmin, ymax, xmax] normalized to 0-1000."

image = Image.open("/path/to/image.png")

config = types.GenerateContentConfig(
  response_mime_type="application/json"
  )

response = client.models.generate_content(model="gemini-3-flash-preview",
                                          contents=[image, prompt],
                                          config=config
                                          )

width, height = image.size
bounding_boxes = json.loads(response.text)

converted_bounding_boxes = []
for bounding_box in bounding_boxes:
    abs_y1 = int(bounding_box["box_2d"][0]/1000 * height)
    abs_x1 = int(bounding_box["box_2d"][1]/1000 * width)
    abs_y2 = int(bounding_box["box_2d"][2]/1000 * height)
    abs_x2 = int(bounding_box["box_2d"][3]/1000 * width)
    converted_bounding_boxes.append([abs_x1, abs_y1, abs_x2, abs_y2])

print("Image size: ", width, height)
print("Bounding boxes:", converted_bounding_boxes)
Untuk contoh lainnya, lihat notebook berikut di Gemini Cookbook:
Segmentasi
Mulai dari Gemini 2.5, model tidak hanya mendeteksi item, tetapi juga menyegmentasikannya dan memberikan masker konturnya.
Model memprediksi daftar JSON, dengan setiap item mewakili mask segmentasi.
Setiap item memiliki kotak pembatas ("box_2d") dalam format [y0, x0, y1, x1] dengan
koordinat yang dinormalisasi antara 0 dan 1000, label ("label") yang mengidentifikasi
objek, dan terakhir mask segmentasi di dalam kotak pembatas, sebagai png yang dienkode base64
yang merupakan peta probabilitas dengan nilai antara 0 dan 255.
Masker perlu diubah ukurannya agar sesuai dengan dimensi kotak pembatas, lalu
dikonversi menjadi biner pada ambang batas keyakinan Anda (127 untuk titik tengah).
Python
from google import genai
from google.genai import types
from PIL import Image, ImageDraw
import io
import base64
import json
import numpy as np
import os

client = genai.Client()

def parse_json(json_output: str):
  # Parsing out the markdown fencing
  lines = json_output.splitlines()
  for i, line in enumerate(lines):
    if line == "```json":
      json_output = "\n".join(lines[i+1:])  # Remove everything before "```json"
      output = json_output.split("```")[0]  # Remove everything after the closing "```"
      break  # Exit the loop once "```json" is found
  return json_output

def extract_segmentation_masks(image_path: str, output_dir: str = "segmentation_outputs"):
  # Load and resize image
  im = Image.open(image_path)
  im.thumbnail([1024, 1024], Image.Resampling.LANCZOS)

  prompt = """
  Give the segmentation masks for the wooden and glass items.
  Output a JSON list of segmentation masks where each entry contains the 2D
  bounding box in the key "box_2d", the segmentation mask in key "mask", and
  the text label in the key "label". Use descriptive labels.
  """

  config = types.GenerateContentConfig(
    thinking_config=types.ThinkingConfig(thinking_budget=0) # set thinking_budget to 0 for better results in object detection
  )

  response = client.models.generate_content(
    model="gemini-3-flash-preview",
    contents=[prompt, im], # Pillow images can be directly passed as inputs (which will be converted by the SDK)
    config=config
  )

  # Parse JSON response
  items = json.loads(parse_json(response.text))

  # Create output directory
  os.makedirs(output_dir, exist_ok=True)

  # Process each mask
  for i, item in enumerate(items):
      # Get bounding box coordinates
      box = item["box_2d"]
      y0 = int(box[0] / 1000 * im.size[1])
      x0 = int(box[1] / 1000 * im.size[0])
      y1 = int(box[2] / 1000 * im.size[1])
      x1 = int(box[3] / 1000 * im.size[0])

      # Skip invalid boxes
      if y0 >= y1 or x0 >= x1:
          continue

      # Process mask
      png_str = item["mask"]
      if not png_str.startswith("data:image/png;base64,"):
          continue

      # Remove prefix
      png_str = png_str.removeprefix("data:image/png;base64,")
      mask_data = base64.b64decode(png_str)
      mask = Image.open(io.BytesIO(mask_data))

      # Resize mask to match bounding box
      mask = mask.resize((x1 - x0, y1 - y0), Image.Resampling.BILINEAR)

      # Convert mask to numpy array for processing
      mask_array = np.array(mask)

      # Create overlay for this mask
      overlay = Image.new('RGBA', im.size, (0, 0, 0, 0))
      overlay_draw = ImageDraw.Draw(overlay)

      # Create overlay for the mask
      color = (255, 255, 255, 200)
      for y in range(y0, y1):
          for x in range(x0, x1):
              if mask_array[y - y0, x - x0] > 128:  # Threshold for mask
                  overlay_draw.point((x, y), fill=color)

      # Save individual mask and its overlay
      mask_filename = f"{item['label']}_{i}_mask.png"
      overlay_filename = f"{item['label']}_{i}_overlay.png"

      mask.save(os.path.join(output_dir, mask_filename))

      # Create and save overlay
      composite = Image.alpha_composite(im.convert('RGBA'), overlay)
      composite.save(os.path.join(output_dir, overlay_filename))
      print(f"Saved mask and overlay for {item['label']} to {output_dir}")

# Example usage
if __name__ == "__main__":
  extract_segmentation_masks("path/to/image.png")
Lihat contoh segmentasi dalam panduan cookbook untuk contoh yang lebih mendetail.
Format gambar yang didukung
Gemini mendukung jenis MIME format gambar berikut:
- PNG -
image/png - JPEG -
image/jpeg - WEBP -
image/webp - HEIC -
image/heic - HEIF -
image/heif
Untuk mempelajari metode input file lainnya, lihat panduan Metode input file.
Kemampuan
Semua versi model Gemini bersifat multimodal dan dapat digunakan dalam berbagai tugas pemrosesan gambar dan computer vision, termasuk, tetapi tidak terbatas pada pemberian teks pada gambar, pertanyaan dan jawaban visual, klasifikasi gambar, deteksi dan segmentasi objek.
Gemini dapat mengurangi kebutuhan untuk menggunakan model ML khusus, bergantung pada persyaratan kualitas dan performa Anda.
Versi model terbaru dilatih secara khusus untuk meningkatkan akurasi tugas khusus selain kemampuan umum, seperti deteksi objek dan segmentasi yang ditingkatkan.
Batasan dan informasi teknis utama
Batas file
Model Gemini mendukung maksimum 3.600 file gambar per permintaan.
Penghitungan token
- 258 token jika kedua dimensi <= 384 piksel. Gambar yang lebih besar diatur menjadi ubin 768x768 piksel, yang masing-masing berharga 258 token.
Rumus kasar untuk menghitung jumlah kartu adalah sebagai berikut:
- Hitung ukuran unit pangkas yang kira-kira: floor(min(width, height) / 1.5).
- Bagi setiap dimensi dengan ukuran unit pangkas dan kalikan bersama untuk mendapatkan jumlah petak.
Misalnya, gambar berdimensi 960x540 akan memiliki ukuran unit pangkas 360. Bagi setiap dimensi dengan 360 dan jumlah petak adalah 3 * 2 = 6.
Resolusi media
Gemini 3 memperkenalkan kontrol terperinci atas pemrosesan visi multimodal dengan parameter
media_resolution. Parameter media_resolution menentukan
jumlah maksimum token yang dialokasikan per gambar input atau frame video.
Resolusi yang lebih tinggi meningkatkan kemampuan model untuk membaca teks kecil atau mengidentifikasi detail kecil, tetapi meningkatkan penggunaan token dan latensi.
Untuk mengetahui detail selengkapnya tentang parameter dan pengaruhnya terhadap penghitungan token, lihat panduan resolusi media.
Tips dan praktik terbaik
- Pastikan gambar diputar dengan benar.
- Gunakan gambar yang jelas dan tidak buram.
- Saat menggunakan satu gambar dengan teks, tempatkan perintah teks setelah bagian gambar dalam array
contents.
Langkah berikutnya
Panduan ini menunjukkan cara mengupload file gambar dan membuat output teks dari input gambar. Untuk mempelajari lebih lanjut, lihat referensi berikut:
- Files API: Pelajari lebih lanjut cara mengupload dan mengelola file untuk digunakan dengan Gemini.
- Petunjuk sistem: Petunjuk sistem memungkinkan Anda mengarahkan perilaku model berdasarkan kebutuhan dan kasus penggunaan spesifik Anda.
- Strategi perintah file: Gemini API mendukung perintah dengan data teks, gambar, audio, dan video, yang juga dikenal sebagai perintah multimodal.
- Panduan keamanan: Terkadang model AI generatif menghasilkan output yang tidak terduga, seperti output yang tidak akurat, bias, atau menyinggung. Pemrosesan pasca-pembuatan dan evaluasi manusia sangat penting untuk membatasi risiko bahaya dari output tersebut.