
MediaPipe 手勢辨識器工作可讓您即時辨識手勢,並提供已辨識的手勢結果和偵測到的手部地標。這些操作說明會說明如何在 Python 應用程式中使用手勢辨識器。
如要瞭解這項工作的實際運作情形,請查看網路示範。如要進一步瞭解這項工作的功能、模型和設定選項,請參閱總覽。
程式碼範例
手勢辨識器的範例程式碼提供了 Python 中此工作的完整實作方式,供您參考。這段程式碼可協助您測試此工作,並開始建構自己的手勢辨識器。您可以只使用網頁瀏覽器查看、執行及編輯手勢辨識器範例程式碼。
如果您要為 Raspberry Pi 實作手勢辨識器,請參閱 Raspberry Pi 範例應用程式。
設定
本節將說明設定開發環境和程式碼專案的關鍵步驟,以便使用手勢辨識器。如要進一步瞭解如何設定開發環境以使用 MediaPipe 工作,包括平台版本需求,請參閱 Python 設定指南。
套件
MediaPipe 手勢辨識器工作需要 mediapipe PyPI 套件。您可以透過下列方式安裝及匯入這些依附元件:
$ python -m pip install mediapipe
匯入
匯入下列類別,存取手勢辨識器工作函式:
import mediapipe as mp
from mediapipe.tasks import python
from mediapipe.tasks.python import vision
型號
MediaPipe 手勢辨識器工作需要訓練過的模型套件,且必須與此工作相容。如要進一步瞭解手勢辨識器可用的訓練模型,請參閱任務總覽的「模型」一節。
選取並下載模型,然後將其儲存在本機目錄中:
model_path = '/absolute/path/to/gesture_recognizer.task'
在「Model Name」參數中指定模型路徑,如下所示:
base_options = BaseOptions(model_asset_path=model_path)
建立工作
MediaPipe 手勢辨識器工作會使用 create_from_options 函式設定工作。create_from_options 函式會接受設定選項的值,以便處理。如要進一步瞭解設定選項,請參閱「設定選項」。
以下程式碼示範如何建構及設定此工作。
這些範例也說明圖片、影片檔案和直播影片串流的任務建構變化。
圖片
import mediapipe as mp

BaseOptions = mp.tasks.BaseOptions
GestureRecognizer = mp.tasks.vision.GestureRecognizer
GestureRecognizerOptions = mp.tasks.vision.GestureRecognizerOptions
VisionRunningMode = mp.tasks.vision.RunningMode

# Create a gesture recognizer instance with the image mode:
options = GestureRecognizerOptions(
    base_options=BaseOptions(model_asset_path='/path/to/model.task'),
    running_mode=VisionRunningMode.IMAGE)
with GestureRecognizer.create_from_options(options) as recognizer:
  # The detector is initialized. Use it here.
  # ...
影片
import mediapipe as mp

BaseOptions = mp.tasks.BaseOptions
GestureRecognizer = mp.tasks.vision.GestureRecognizer
GestureRecognizerOptions = mp.tasks.vision.GestureRecognizerOptions
VisionRunningMode = mp.tasks.vision.RunningMode

# Create a gesture recognizer instance with the video mode:
options = GestureRecognizerOptions(
    base_options=BaseOptions(model_asset_path='/path/to/model.task'),
    running_mode=VisionRunningMode.VIDEO)
with GestureRecognizer.create_from_options(options) as recognizer:
  # The detector is initialized. Use it here.
  # ...
直播
import mediapipe as mp

BaseOptions = mp.tasks.BaseOptions
GestureRecognizer = mp.tasks.vision.GestureRecognizer
GestureRecognizerOptions = mp.tasks.vision.GestureRecognizerOptions
GestureRecognizerResult = mp.tasks.vision.GestureRecognizerResult
VisionRunningMode = mp.tasks.vision.RunningMode

# Create a gesture recognizer instance with the live stream mode:
def print_result(result: GestureRecognizerResult, output_image: mp.Image, timestamp_ms: int):
    print('gesture recognition result: {}'.format(result))

options = GestureRecognizerOptions(
    base_options=BaseOptions(model_asset_path='/path/to/model.task'),
    running_mode=VisionRunningMode.LIVE_STREAM,
    result_callback=print_result)
with GestureRecognizer.create_from_options(options) as recognizer:
  # The detector is initialized. Use it here.
  # ...
設定選項
此工作包含下列 Python 應用程式的設定選項:
| 選項名稱 | 說明 | 值範圍 | 預設值 | |
|---|---|---|---|---|
running_mode |
設定工作執行模式。共有三種模式: IMAGE:單一圖片輸入模式。 VIDEO:影片解碼影格模式。 LIVE_STREAM:輸入資料 (例如來自攝影機的資料) 的直播模式。在這個模式中,必須呼叫 resultListener,才能設定事件監聽器,以非同步方式接收結果。 |
{IMAGE, VIDEO, LIVE_STREAM} |
IMAGE |
|
num_hands |
GestureRecognizer 最多可偵測的手數。 |
Any integer > 0 |
1 |
|
min_hand_detection_confidence |
在手掌偵測模型中,手部偵測的最低信賴分數,才會視為成功。 | 0.0 - 1.0 |
0.5 |
|
min_hand_presence_confidence |
手部地標偵測模型中手部存在分數的最低可信度分數。在手勢辨識器的影片模式和直播模式中,如果手標記模型的手部存在可信度分數低於此閾值,則會觸發手掌偵測模型。否則,系統會使用輕量手勢追蹤演算法,判斷手的位置,以便後續的顯著點偵測。 | 0.0 - 1.0 |
0.5 |
|
min_tracking_confidence |
手部追蹤系統判定為成功的最低可信度分數。這是目前影格和上一個影格中手的定界框交併比閾值。在手勢辨識器的「影片」模式和「串流」模式中,如果追蹤失敗,手勢辨識器會觸發手部偵測。否則系統會略過手勢偵測。 | 0.0 - 1.0 |
0.5 |
|
canned_gestures_classifier_options |
設定預先錄製手勢分類器行為的選項。罐頭手勢為 ["None", "Closed_Fist", "Open_Palm", "Pointing_Up", "Thumb_Down", "Thumb_Up", "Victory", "ILoveYou"] |
|
|
|
custom_gestures_classifier_options |
設定自訂手勢分類器行為的選項。 |
|
|
|
result_callback |
在手勢辨識器處於即時串流模式時,將結果事件監聽器設為以非同步方式接收分類結果。只有在執行模式設為 LIVE_STREAM 時,才能使用 |
ResultListener |
不適用 | 不適用 |
準備資料
將輸入內容設為圖片檔案或 Numpy 陣列,然後轉換為 mediapipe.Image 物件。如果輸入內容是網路攝影機的影片檔案或直播內容,您可以使用 OpenCV 等外部程式庫,將輸入影格載入為 NumPy 陣列。
圖片
import mediapipe as mp

# Load the input image from an image file.
mp_image = mp.Image.create_from_file('/path/to/image')

# Load the input image from a numpy array.
mp_image = mp.Image(image_format=mp.ImageFormat.SRGB, data=numpy_image)
影片
import mediapipe as mp

# Use OpenCV’s VideoCapture to load the input video.

# Load the frame rate of the video using OpenCV’s CV_CAP_PROP_FPS
# You’ll need it to calculate the timestamp for each frame.

# Loop through each frame in the video using VideoCapture#read()

# Convert the frame received from OpenCV to a MediaPipe’s Image object.
mp_image = mp.Image(image_format=mp.ImageFormat.SRGB, data=numpy_frame_from_opencv)
直播
import mediapipe as mp

# Use OpenCV’s VideoCapture to start capturing from the webcam.

# Create a loop to read the latest frame from the camera using VideoCapture#read()

# Convert the frame received from OpenCV to a MediaPipe’s Image object.
mp_image = mp.Image(image_format=mp.ImageFormat.SRGB, data=numpy_frame_from_opencv)
執行工作
手勢辨識器會使用 recognize、recognize_for_video 和 recognize_async 函式觸發推論。手勢辨識功能包括預先處理輸入資料、偵測圖片中的手部、偵測手部地標,以及根據地標辨識手勢。
以下程式碼示範如何使用工作模型執行處理作業。
圖片
# Perform gesture recognition on the provided single image.
# The gesture recognizer must be created with the image mode.
gesture_recognition_result = recognizer.recognize(mp_image)
影片
# Perform gesture recognition on the provided single image.
# The gesture recognizer must be created with the video mode.
gesture_recognition_result = recognizer.recognize_for_video(mp_image, frame_timestamp_ms)
直播
# Send live image data to perform gesture recognition.
# The results are accessible via the `result_callback` provided in
# the `GestureRecognizerOptions` object.
# The gesture recognizer must be created with the live stream mode.
recognizer.recognize_async(mp_image, frame_timestamp_ms)
注意事項:
- 在影片模式或直播模式中執行時,您也必須為手勢辨識器工作提供輸入影格時間戳記。
- 在圖片或影片模型中執行時,Gesture Recognizer 工作會阻斷目前的執行緒,直到處理完輸入圖片或影格為止。
- 在直播模式下執行時,手勢辨識器工作不會阻斷目前的執行緒,而是立即傳回。每次處理完輸入影格時,它都會使用辨識結果叫用結果監聽器。如果在手勢辨識器工作單元忙於處理另一個影格時呼叫辨識函式,工作單元會忽略新的輸入影格。
如需在圖片上執行手勢辨識器的完整範例,請參閱程式碼範例。
處理及顯示結果
手勢辨識器會為每次執行的辨識作業產生手勢偵測結果物件。結果物件包含圖片座標中的手標記、世界座標中的手標記、手的慣用手(左手/右手),以及偵測到的手部手勢類別。
以下是這項工作的輸出資料範例:
產生的 GestureRecognizerResult 包含四個元件,每個元件都是陣列,每個元素都包含偵測到單一手的偵測結果。
慣用手
慣用手代表偵測到的手是左手還是右手。
手勢
系統偵測到的手勢類別。
地標
手部有 21 個地標,每個地標都由
x、y和z座標組成。x和y座標會分別根據圖片寬度和高度,正規化為 [0.0, 1.0]。z座標代表地標深度,其中手腕的深度為原點。值越小,地標與相機的距離就越近。z的大小會使用與x大致相同的刻度。世界著名地標
21 個手部地標也會以世界座標呈現。每個地標都由
x、y和z組成,代表以公尺為單位的實際 3D 座標,起點位於手的幾何中心。
GestureRecognizerResult:
  Handedness:
    Categories #0:
      index        : 0
      score        : 0.98396
      categoryName : Left
  Gestures:
    Categories #0:
      score        : 0.76893
      categoryName : Thumb_Up
  Landmarks:
    Landmark #0:
      x            : 0.638852
      y            : 0.671197
      z            : -3.41E-7
    Landmark #1:
      x            : 0.634599
      y            : 0.536441
      z            : -0.06984
    ... (21 landmarks for a hand)
  WorldLandmarks:
    Landmark #0:
      x            : 0.067485
      y            : 0.031084
      z            : 0.055223
    Landmark #1:
      x            : 0.063209
      y            : -0.00382
      z            : 0.020920
    ... (21 world landmarks for a hand)
下圖是工作輸出內容的視覺化呈現:
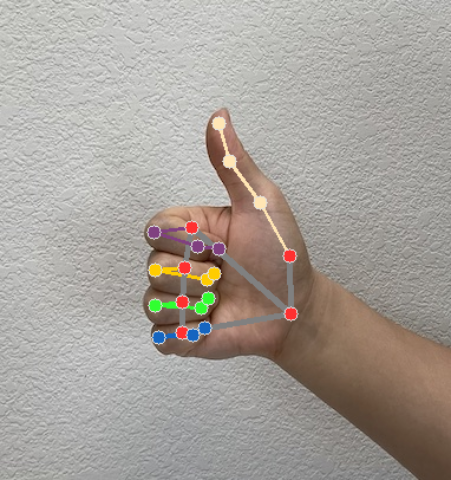
手勢辨識器範例程式碼示範如何顯示工作傳回的辨識結果,詳情請參閱程式碼範例。