
งานตัวตรวจจับใบหน้า MediaPipe ช่วยให้คุณตรวจจับใบหน้าในรูปภาพหรือวิดีโอได้ คุณสามารถใช้งานนี้เพื่อค้นหาใบหน้าและลักษณะใบหน้าภายในเฟรม งานนี้ใช้โมเดลแมชชีนเลิร์นนิง (ML) ที่ทำงานกับรูปภาพเดี่ยวหรือสตรีมรูปภาพที่ต่อเนื่อง งานนี้จะแสดงตำแหน่งใบหน้าพร้อมกับจุดสำคัญของใบหน้าต่อไปนี้ ตาซ้าย ตาขวา ปลายจมูก ปาก โหนกแก้มด้านซ้าย และโหนกแก้มด้านขวา
ตัวอย่างโค้ดที่อธิบายในวิธีการเหล่านี้มีอยู่ใน GitHub ดูข้อมูลเพิ่มเติมเกี่ยวกับความสามารถ รูปแบบ และตัวเลือกการกําหนดค่าของงานนี้ได้ที่ภาพรวม
ตัวอย่างโค้ด
โค้ดตัวอย่างสำหรับ Face Detector แสดงการใช้งานที่สมบูรณ์ของงานนี้ใน Python เพื่อเป็นข้อมูลอ้างอิง โค้ดนี้จะช่วยคุณทดสอบงานนี้และเริ่มต้นสร้างโปรแกรมตรวจจับใบหน้าของคุณเอง คุณสามารถดู เรียกใช้ และแก้ไขโค้ดตัวอย่างโปรแกรมตรวจจับใบหน้าได้โดยใช้เพียงเว็บเบราว์เซอร์
หากใช้เครื่องมือตรวจจับใบหน้าสำหรับ Raspberry Pi โปรดดูตัวอย่างแอป Raspberry Pi
ตั้งค่า
ส่วนนี้จะอธิบายขั้นตอนสำคัญในการตั้งค่าสภาพแวดล้อมการพัฒนาและโปรเจ็กต์โค้ดเพื่อใช้ Face Detector โดยเฉพาะ ดูข้อมูลทั่วไปเกี่ยวกับการตั้งค่าสภาพแวดล้อมการพัฒนาซอฟต์แวร์เพื่อใช้งาน MediaPipe รวมถึงข้อกำหนดเวอร์ชันแพลตฟอร์มได้ที่คู่มือการตั้งค่าสำหรับ Python
แพ็กเกจ
ภารกิจของ MediaPipe Face Detector ต้องใช้แพ็กเกจ mediapipe PyPI คุณสามารถติดตั้งและนําเข้าข้อมูลต่อไปนี้ได้
$ python -m pip install mediapipe
การนำเข้า
นําเข้าคลาสต่อไปนี้เพื่อเข้าถึงฟังก์ชันงานของ Face Detector
import mediapipe as mp
from mediapipe.tasks import python
from mediapipe.tasks.python import vision
รุ่น
งานตัวตรวจจับใบหน้า MediaPipe ต้องใช้โมเดลที่ผ่านการฝึกซึ่งเข้ากันได้กับงานนี้ ดูข้อมูลเพิ่มเติมเกี่ยวกับโมเดลที่ผ่านการฝึกอบรมแล้วสำหรับเครื่องมือตรวจจับใบหน้าได้ที่ส่วนโมเดลในภาพรวมของงาน
เลือกและดาวน์โหลดโมเดล แล้วจัดเก็บไว้ในไดเรกทอรีในเครื่อง
model_path = '/absolute/path/to/face_detector.task'
ใช้พารามิเตอร์BaseOptionsออบเจ็กต์ model_asset_path เพื่อระบุเส้นทางของโมเดลที่จะใช้ ดูตัวอย่างโค้ดได้ที่ส่วนถัดไป
สร้างงาน
งานตัวตรวจจับใบหน้า MediaPipe ใช้ฟังก์ชัน create_from_options เพื่อตั้งค่างาน ฟังก์ชัน create_from_options ยอมรับค่าสำหรับตัวเลือกการกําหนดค่าที่จะจัดการ ดูข้อมูลเพิ่มเติมเกี่ยวกับตัวเลือกการกำหนดค่าได้ที่ตัวเลือกการกำหนดค่า
โค้ดต่อไปนี้แสดงวิธีสร้างและกําหนดค่างานนี้
ตัวอย่างเหล่านี้ยังแสดงรูปแบบต่างๆ ของการสร้างงานสำหรับรูปภาพ ไฟล์วิดีโอ และไลฟ์สตรีมด้วย
รูปภาพ
import mediapipe as mp

BaseOptions = mp.tasks.BaseOptions
FaceDetector = mp.tasks.vision.FaceDetector
FaceDetectorOptions = mp.tasks.vision.FaceDetectorOptions
VisionRunningMode = mp.tasks.vision.RunningMode

# Create a face detector instance with the image mode:
options = FaceDetectorOptions(
    base_options=BaseOptions(model_asset_path='/path/to/model.task'),
    running_mode=VisionRunningMode.IMAGE)
with FaceDetector.create_from_options(options) as detector:
  # The detector is initialized. Use it here.
  # ...
วิดีโอ
import mediapipe as mp

BaseOptions = mp.tasks.BaseOptions
FaceDetector = mp.tasks.vision.FaceDetector
FaceDetectorOptions = mp.tasks.vision.FaceDetectorOptions
VisionRunningMode = mp.tasks.vision.RunningMode

# Create a face detector instance with the video mode:
options = FaceDetectorOptions(
    base_options=BaseOptions(model_asset_path='/path/to/model.task'),
    running_mode=VisionRunningMode.VIDEO)
with FaceDetector.create_from_options(options) as detector:
  # The detector is initialized. Use it here.
  # ...
ไลฟ์สด
import mediapipe as mp

BaseOptions = mp.tasks.BaseOptions
FaceDetector = mp.tasks.vision.FaceDetector
FaceDetectorOptions = mp.tasks.vision.FaceDetectorOptions
FaceDetectorResult = mp.tasks.vision.FaceDetectorResult
VisionRunningMode = mp.tasks.vision.RunningMode

# Create a face detector instance with the live stream mode:
def print_result(result: FaceDetectorResult, output_image: mp.Image, timestamp_ms: int):
    print('face detector result: {}'.format(result))

options = FaceDetectorOptions(
    base_options=BaseOptions(model_asset_path='/path/to/model.task'),
    running_mode=VisionRunningMode.LIVE_STREAM,
    result_callback=print_result)
with FaceDetector.create_from_options(options) as detector:
  # The detector is initialized. Use it here.
  # ...
ดูตัวอย่างการสร้าง Face Detector เพื่อใช้กับรูปภาพได้ที่ตัวอย่างโค้ด
ตัวเลือกการกำหนดค่า
งานนี้มีตัวเลือกการกำหนดค่าต่อไปนี้สำหรับแอปพลิเคชัน Python
| ชื่อตัวเลือก | คำอธิบาย | ช่วงของค่า | ค่าเริ่มต้น |
|---|---|---|---|
running_mode |
ตั้งค่าโหมดการทํางานสําหรับงาน โดยโหมดมี 3 แบบ ดังนี้ รูปภาพ: โหมดสำหรับอินพุตรูปภาพเดียว วิดีโอ: โหมดสำหรับเฟรมที่ถอดรหัสของวิดีโอ LIVE_STREAM: โหมดสตรีมแบบสดของข้อมูลอินพุต เช่น จากกล้อง ในโหมดนี้ คุณต้องเรียกใช้ resultListener เพื่อตั้งค่า Listener เพื่อรับผลลัพธ์แบบไม่พร้อมกัน |
{IMAGE, VIDEO, LIVE_STREAM} |
IMAGE |
min_detection_confidence |
คะแนนความเชื่อมั่นขั้นต่ำที่ถือว่าการตรวจจับใบหน้าสำเร็จ | Float [0,1] |
0.5 |
min_suppression_threshold |
เกณฑ์ขั้นต่ำที่ไม่ใช่การลบสูงสุดสำหรับการจับภาพใบหน้าที่จะถือว่าซ้อนทับกัน | Float [0,1] |
0.3 |
result_callback |
ตั้งค่าโปรแกรมรับฟังผลลัพธ์ให้รับผลลัพธ์การตรวจจับแบบไม่พร้อมกันเมื่อเครื่องมือตรวจจับใบหน้าอยู่ในโหมดสตรีมแบบสด ใช้ได้เมื่อตั้งค่าโหมดการทํางานเป็น LIVE_STREAM เท่านั้น |
N/A |
Not set |
เตรียมข้อมูล
เตรียมอินพุตเป็นไฟล์รูปภาพหรืออาร์เรย์ NumPy จากนั้นแปลงเป็นออบเจ็กต์ mediapipe.Image หากอินพุตเป็นไฟล์วิดีโอหรือสตรีมแบบสดจากเว็บแคม คุณสามารถใช้ไลบรารีภายนอก เช่น OpenCV เพื่อโหลดเฟรมอินพุตเป็นอาร์เรย์ numpy
รูปภาพ
import mediapipe as mp

# Load the input image from an image file.
mp_image = mp.Image.create_from_file('/path/to/image')

# Load the input image from a numpy array.
mp_image = mp.Image(image_format=mp.ImageFormat.SRGB, data=numpy_image)
วิดีโอ
import mediapipe as mp

# Use OpenCV’s VideoCapture to load the input video.

# Load the frame rate of the video using OpenCV’s CV_CAP_PROP_FPS
# You’ll need it to calculate the timestamp for each frame.

# Loop through each frame in the video using VideoCapture#read()

# Convert the frame received from OpenCV to a MediaPipe’s Image object.
mp_image = mp.Image(image_format=mp.ImageFormat.SRGB, data=numpy_frame_from_opencv)
ไลฟ์สด
import mediapipe as mp

# Use OpenCV’s VideoCapture to start capturing from the webcam.

# Create a loop to read the latest frame from the camera using VideoCapture#read()

# Convert the frame received from OpenCV to a MediaPipe’s Image object.
mp_image = mp.Image(image_format=mp.ImageFormat.SRGB, data=numpy_frame_from_opencv)
เรียกใช้งาน
ตัวตรวจจับใบหน้าใช้ฟังก์ชัน detect, detect_for_video และ detect_async เพื่อทริกเกอร์การอนุมาน สำหรับการตรวจจับใบหน้า ขั้นตอนนี้เกี่ยวข้องกับการประมวลผลข้อมูลอินพุตล่วงหน้าและการตรวจจับใบหน้าในรูปภาพ
โค้ดต่อไปนี้แสดงวิธีดำเนินการประมวลผลด้วยโมเดลงาน
รูปภาพ
# Perform face detection on the provided single image.
# The face detector must be created with the image mode.
face_detector_result = detector.detect(mp_image)
วิดีโอ
# Perform face detection on the provided single image.
# The face detector must be created with the video mode.
face_detector_result = detector.detect_for_video(mp_image, frame_timestamp_ms)
ไลฟ์สด
# Send live image data to perform face detection.
# The results are accessible via the `result_callback` provided in
# the `FaceDetectorOptions` object.
# The face detector must be created with the live stream mode.
detector.detect_async(mp_image, frame_timestamp_ms)
โปรดทราบดังต่อไปนี้
- เมื่อทำงานในโหมดวิดีโอหรือโหมดสตรีมแบบสด ให้ระบุการประทับเวลาของเฟรมอินพุตให้กับงาน Face Detector ด้วย
- เมื่อทำงานในโมเดลรูปภาพหรือวิดีโอ งานของโปรแกรมตรวจจับใบหน้าจะบล็อกเธรดปัจจุบันจนกว่าจะประมวลผลรูปภาพหรือเฟรมอินพุตเสร็จ
- เมื่อทำงานในโหมดสตรีมแบบสด งานของ Face Detector จะแสดงผลทันทีและไม่บล็อกเธรดปัจจุบัน โดยจะเรียกใช้โปรแกรมรับฟังผลลัพธ์พร้อมผลการตรวจจับทุกครั้งที่ประมวลผลเฟรมอินพุตเสร็จสิ้น หากมีการเรียกใช้ฟังก์ชันการตรวจจับเมื่องานตัวตรวจจับใบหน้ากำลังประมวลผลเฟรมอื่นอยู่ งานจะละเว้นเฟรมอินพุตใหม่
ดูตัวอย่างที่สมบูรณ์ของการใช้ Face Detector ในรูปภาพได้ที่รายละเอียดในตัวอย่างโค้ด
จัดการและแสดงผลลัพธ์
เครื่องมือตรวจจับใบหน้าจะแสดงผลออบเจ็กต์ FaceDetectorResult สำหรับการเรียกใช้การตรวจจับแต่ละครั้ง ออบเจ็กต์ผลลัพธ์ประกอบด้วยกล่องขอบเขตของใบหน้าที่ตรวจพบและคะแนนความเชื่อมั่นสำหรับใบหน้าที่ตรวจพบแต่ละรายการ
ต่อไปนี้เป็นตัวอย่างข้อมูลเอาต์พุตจากงานนี้
FaceDetectionResult:
  Detections:
    Detection #0:
      BoundingBox:
        origin_x: 126
        origin_y: 100
        width: 463
        height: 463
      Categories:
        Category #0:
          index: 0
          score: 0.9729152917861938
      NormalizedKeypoints:
        NormalizedKeypoint #0:
          x: 0.18298381567001343
          y: 0.2961040139198303
        NormalizedKeypoint #1:
          x: 0.3302789330482483
          y: 0.29289937019348145
        ... (6 keypoints for each face)
    Detection #1:
      BoundingBox:
        origin_x: 616
        origin_y: 193
        width: 430
        height: 430
      Categories:
        Category #0:
          index: 0
          score: 0.9251380562782288
      NormalizedKeypoints:
        NormalizedKeypoint #0:
          x: 0.6151331663131714
          y: 0.3713381886482239
        NormalizedKeypoint #1:
          x: 0.7460576295852661
          y: 0.38825345039367676
        ... (6 keypoints for each face)
รูปภาพต่อไปนี้แสดงภาพเอาต์พุตของงาน
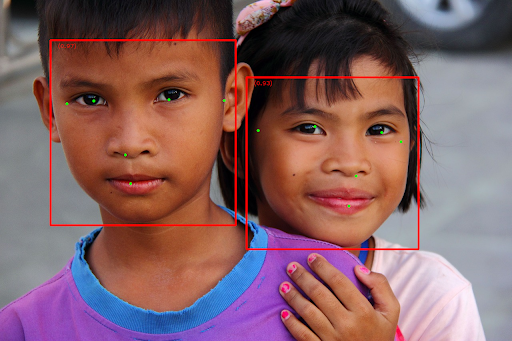
สำหรับรูปภาพที่ไม่มีกรอบล้อมรอบ โปรดดูรูปภาพต้นฉบับ
โค้ดตัวอย่างของ Face Detector แสดงวิธีแสดงผลลัพธ์ที่ได้จากงาน ดูรายละเอียดได้ในตัวอย่างโค้ด