
MediaPipe के चेहरे की पहचान करने वाले टूल की मदद से, किसी इमेज या वीडियो में चेहरों की पहचान की जा सकती है. इस टास्क का इस्तेमाल करके, फ़्रेम में चेहरों और चेहरे की विशेषताओं का पता लगाया जा सकता है. यह टास्क, मशीन लर्निंग (एमएल) मॉडल का इस्तेमाल करता है. यह मॉडल, एक या लगातार कई इमेज के साथ काम करता है. यह टास्क, चेहरे की जगहों के साथ-साथ, चेहरे के इन मुख्य पॉइंट का पता लगाता है: बाईं आंख, दाईं आंख, नाक की नोक, मुंह, बाईं आंख का ट्रैगियन, और दाईं आंख का ट्रैगियन.
इन निर्देशों में बताया गया कोड सैंपल, GitHub पर उपलब्ध है. इस टास्क की सुविधाओं, मॉडल, और कॉन्फ़िगरेशन के विकल्पों के बारे में ज़्यादा जानने के लिए, खास जानकारी देखें.
कोड का उदाहरण
फ़ेस डिटेक्टर के लिए दिए गए उदाहरण के कोड में, Python में इस टास्क को पूरा करने का तरीका बताया गया है. इस कोड की मदद से, इस टास्क की जांच की जा सकती है और अपना चेहरा पहचानने वाला डिटेक्टर बनाने की प्रोसेस शुरू की जा सकती है. सिर्फ़ वेब ब्राउज़र का इस्तेमाल करके, फ़ेस डिटेक्टर के उदाहरण के तौर पर दिए गए कोड को देखा, चलाया, और उसमें बदलाव किया जा सकता है.
अगर Raspberry Pi के लिए फ़ेस डिटेक्टर लागू किया जा रहा है, तो Raspberry Pi के लिए उदाहरण ऐप्लिकेशन देखें.
सेटअप
इस सेक्शन में, डेवलपमेंट एनवायरमेंट और कोड प्रोजेक्ट सेट अप करने के मुख्य चरणों के बारे में बताया गया है. ऐसा खास तौर पर, चेहरे की पहचान करने की सुविधा का इस्तेमाल करने के लिए किया जाता है. MediaPipe Tasks का इस्तेमाल करने के लिए, डेवलपमेंट एनवायरमेंट सेट अप करने के बारे में सामान्य जानकारी पाने के लिए, Python के लिए सेटअप गाइड देखें. इसमें प्लैटफ़ॉर्म के वर्शन से जुड़ी ज़रूरी शर्तें भी शामिल हैं.
पैकेज
MediaPipe के फ़ेस डिटेक्टर टास्क के लिए, mediapipe PyPI पैकेज की ज़रूरत होती है. इन डिपेंडेंसी को इनके साथ इंस्टॉल और इंपोर्ट किया जा सकता है:
$ python -m pip install mediapipe
आयात
चेहरे की पहचान करने वाले टैस्क के फ़ंक्शन ऐक्सेस करने के लिए, ये क्लास इंपोर्ट करें:
import mediapipe as mp
from mediapipe.tasks import python
from mediapipe.tasks.python import vision
मॉडल
MediaPipe के फ़ेस डिटेक्टर टास्क के लिए, ट्रेन किया गया ऐसा मॉडल ज़रूरी है जो इस टास्क के साथ काम करता हो. चेहरे का पता लगाने वाले टूल के लिए, पहले से ट्रेन किए गए मॉडल के बारे में ज़्यादा जानने के लिए, टास्क की खास जानकारी वाला मॉडल सेक्शन देखें.
मॉडल चुनें और डाउनलोड करें. इसके बाद, उसे किसी लोकल डायरेक्ट्री में सेव करें:
model_path = '/absolute/path/to/face_detector.task'
इस्तेमाल किए जाने वाले मॉडल का पाथ बताने के लिए, BaseOptions ऑब्जेक्ट model_asset_path पैरामीटर का इस्तेमाल करें. कोड का उदाहरण देखने के लिए, अगला सेक्शन देखें.
टास्क बनाना
MediaPipe Face Detector टास्क, टास्क को सेट अप करने के लिए create_from_options फ़ंक्शन का इस्तेमाल करता है. create_from_options फ़ंक्शन, कॉन्फ़िगरेशन के विकल्पों को मैनेज करने के लिए वैल्यू स्वीकार करता है. कॉन्फ़िगरेशन के विकल्पों के बारे में ज़्यादा जानने के लिए, कॉन्फ़िगरेशन के विकल्प लेख पढ़ें.
नीचे दिए गए कोड में, इस टास्क को बनाने और कॉन्फ़िगर करने का तरीका बताया गया है.
इन सैंपल में, इमेज, वीडियो फ़ाइलों, और लाइव स्ट्रीम के लिए, टास्क बनाने के अलग-अलग तरीके भी दिखाए गए हैं.
इमेज
import mediapipe as mp

BaseOptions = mp.tasks.BaseOptions
FaceDetector = mp.tasks.vision.FaceDetector
FaceDetectorOptions = mp.tasks.vision.FaceDetectorOptions
VisionRunningMode = mp.tasks.vision.RunningMode

# Create a face detector instance with the image mode:
options = FaceDetectorOptions(
    base_options=BaseOptions(model_asset_path='/path/to/model.task'),
    running_mode=VisionRunningMode.IMAGE)
with FaceDetector.create_from_options(options) as detector:
  # The detector is initialized. Use it here.
  # ...
वीडियो
import mediapipe as mp

BaseOptions = mp.tasks.BaseOptions
FaceDetector = mp.tasks.vision.FaceDetector
FaceDetectorOptions = mp.tasks.vision.FaceDetectorOptions
VisionRunningMode = mp.tasks.vision.RunningMode

# Create a face detector instance with the video mode:
options = FaceDetectorOptions(
    base_options=BaseOptions(model_asset_path='/path/to/model.task'),
    running_mode=VisionRunningMode.VIDEO)
with FaceDetector.create_from_options(options) as detector:
  # The detector is initialized. Use it here.
  # ...
लाइव स्ट्रीम
import mediapipe as mp

BaseOptions = mp.tasks.BaseOptions
FaceDetector = mp.tasks.vision.FaceDetector
FaceDetectorOptions = mp.tasks.vision.FaceDetectorOptions
FaceDetectorResult = mp.tasks.vision.FaceDetectorResult
VisionRunningMode = mp.tasks.vision.RunningMode

# Create a face detector instance with the live stream mode:
def print_result(result: FaceDetectorResult, output_image: mp.Image, timestamp_ms: int):
    print('face detector result: {}'.format(result))

options = FaceDetectorOptions(
    base_options=BaseOptions(model_asset_path='/path/to/model.task'),
    running_mode=VisionRunningMode.LIVE_STREAM,
    result_callback=print_result)
with FaceDetector.create_from_options(options) as detector:
  # The detector is initialized. Use it here.
  # ...
किसी इमेज के साथ इस्तेमाल करने के लिए, चेहरे का पता लगाने वाला मॉडल बनाने का पूरा उदाहरण देखने के लिए, कोड का उदाहरण देखें.
कॉन्फ़िगरेशन विकल्प
इस टास्क में, Python ऐप्लिकेशन के लिए ये कॉन्फ़िगरेशन विकल्प हैं:
| विकल्प का नाम | ब्यौरा | वैल्यू की रेंज | डिफ़ॉल्ट मान |
|---|---|---|---|
running_mode |
टास्क के लिए रनिंग मोड सेट करता है. इसके तीन मोड हैं: IMAGE: एक इमेज इनपुट के लिए मोड. वीडियो: किसी वीडियो के डिकोड किए गए फ़्रेम के लिए मोड. LIVE_STREAM: कैमरे से मिले इनपुट डेटा की लाइव स्ट्रीम के लिए मोड. इस मोड में, नतीजे असींक्रोनस तरीके से पाने के लिए, एक listener सेट अप करने के लिए, resultListener को कॉल करना होगा. |
{IMAGE, VIDEO, LIVE_STREAM} |
IMAGE |
min_detection_confidence |
चेहरे का पता लगाने के लिए, कम से कम कॉन्फ़िडेंस स्कोर. | Float [0,1] |
0.5 |
min_suppression_threshold |
चेहरे का पता लगाने के लिए, कम से कम नॉन-मैक्सिमम-सप्रेशन थ्रेशोल्ड को ओवरलैप माना जाता है. | Float [0,1] |
0.3 |
result_callback |
जब फ़ेस डिटेक्टर लाइव स्ट्रीम मोड में हो, तो पहचान के नतीजे अलग-अलग समय पर पाने के लिए, नतीजा सुनने वाला सेट करता है. इसका इस्तेमाल सिर्फ़ तब किया जा सकता है, जब रनिंग मोड को LIVE_STREAM पर सेट किया गया हो. |
N/A |
Not set |
डेटा तैयार करना
अपने इनपुट को इमेज फ़ाइल या numpy ऐरे के तौर पर तैयार करें. इसके बाद, उसे mediapipe.Image ऑब्जेक्ट में बदलें. अगर आपका इनपुट कोई वीडियो फ़ाइल या वेबकैम से लाइव स्ट्रीम है, तो अपने इनपुट फ़्रेम को numpy ऐरे के तौर पर लोड करने के लिए, OpenCV जैसी किसी बाहरी लाइब्रेरी का इस्तेमाल किया जा सकता है.
इमेज
import mediapipe as mp

# Load the input image from an image file.
mp_image = mp.Image.create_from_file('/path/to/image')

# Load the input image from a numpy array.
mp_image = mp.Image(image_format=mp.ImageFormat.SRGB, data=numpy_image)
वीडियो
import mediapipe as mp

# Use OpenCV’s VideoCapture to load the input video.

# Load the frame rate of the video using OpenCV’s CV_CAP_PROP_FPS
# You’ll need it to calculate the timestamp for each frame.

# Loop through each frame in the video using VideoCapture#read()

# Convert the frame received from OpenCV to a MediaPipe’s Image object.
mp_image = mp.Image(image_format=mp.ImageFormat.SRGB, data=numpy_frame_from_opencv)
लाइव स्ट्रीम
import mediapipe as mp

# Use OpenCV’s VideoCapture to start capturing from the webcam.

# Create a loop to read the latest frame from the camera using VideoCapture#read()

# Convert the frame received from OpenCV to a MediaPipe’s Image object.
mp_image = mp.Image(image_format=mp.ImageFormat.SRGB, data=numpy_frame_from_opencv)
टास्क चलाना
अनुमान लगाने के लिए, फ़ेस डिटेक्टर detect, detect_for_video, और detect_async फ़ंक्शन का इस्तेमाल करता है. चेहरे की पहचान करने के लिए, इनपुट डेटा को पहले से प्रोसेस करना और इमेज में चेहरों की पहचान करना ज़रूरी है.
नीचे दिए गए कोड में, टास्क मॉडल की मदद से प्रोसेसिंग को लागू करने का तरीका बताया गया है.
इमेज
# Perform face detection on the provided single image.
# The face detector must be created with the image mode.
face_detector_result = detector.detect(mp_image)
वीडियो
# Perform face detection on the provided single image.
# The face detector must be created with the video mode.
face_detector_result = detector.detect_for_video(mp_image, frame_timestamp_ms)
लाइव स्ट्रीम
# Send live image data to perform face detection.
# The results are accessible via the `result_callback` provided in
# the `FaceDetectorOptions` object.
# The face detector must be created with the live stream mode.
detector.detect_async(mp_image, frame_timestamp_ms)
निम्न पर ध्यान दें:
- वीडियो मोड या लाइव स्ट्रीम मोड में चलाने पर, 'चेहरे का पता लगाने वाला' टास्क को इनपुट फ़्रेम का टाइमस्टैंप भी दें.
- इमेज या वीडियो मॉडल में चलने पर, चेहरे का पता लगाने वाला टास्क, मौजूदा थ्रेड को तब तक ब्लॉक करता है, जब तक वह इनपुट इमेज या फ़्रेम को प्रोसेस नहीं कर लेता.
- लाइव स्ट्रीम मोड में चलने पर, चेहरे की पहचान करने वाला टास्क तुरंत रिटर्न करता है और मौजूदा थ्रेड को ब्लॉक नहीं करता. यह हर बार किसी इनपुट फ़्रेम को प्रोसेस करने के बाद, नतीजे के बारे में बताने वाले फ़ंक्शन को, पहचान के नतीजे के साथ कॉल करेगा. अगर चेहरे की पहचान करने वाले टास्क के किसी फ़्रेम को प्रोसेस करने के दौरान, पहचान करने वाले फ़ंक्शन को कॉल किया जाता है, तो टास्क नए इनपुट फ़्रेम को अनदेखा कर देगा.
किसी इमेज पर फ़ेस डिटेक्टर को चलाने का पूरा उदाहरण देखने के लिए, ज़्यादा जानकारी के लिए कोड का उदाहरण देखें.
नतीजों को मैनेज और दिखाना
चेहरे की पहचान करने वाला टूल, हर बार चेहरे का पता लगाने के लिए, एक FaceDetectorResult ऑब्जेक्ट दिखाता है. नतीजे के ऑब्जेक्ट में, पहचाने गए चेहरों के लिए बाउंडिंग बॉक्स और पहचाने गए हर चेहरे के लिए कॉन्फ़िडेंस स्कोर होता है.
यहां इस टास्क के आउटपुट डेटा का उदाहरण दिया गया है:
FaceDetectionResult:
  Detections:
    Detection #0:
      BoundingBox:
        origin_x: 126
        origin_y: 100
        width: 463
        height: 463
      Categories:
        Category #0:
          index: 0
          score: 0.9729152917861938
      NormalizedKeypoints:
        NormalizedKeypoint #0:
          x: 0.18298381567001343
          y: 0.2961040139198303
        NormalizedKeypoint #1:
          x: 0.3302789330482483
          y: 0.29289937019348145
        ... (6 keypoints for each face)
    Detection #1:
      BoundingBox:
        origin_x: 616
        origin_y: 193
        width: 430
        height: 430
      Categories:
        Category #0:
          index: 0
          score: 0.9251380562782288
      NormalizedKeypoints:
        NormalizedKeypoint #0:
          x: 0.6151331663131714
          y: 0.3713381886482239
        NormalizedKeypoint #1:
          x: 0.7460576295852661
          y: 0.38825345039367676
        ... (6 keypoints for each face)
नीचे दी गई इमेज में, टास्क के आउटपुट को विज़ुअलाइज़ किया गया है:
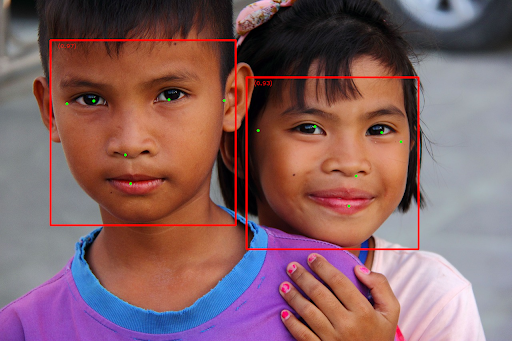
बाउंडिंग बॉक्स के बिना इमेज देखने के लिए, ओरिजनल इमेज देखें.
चेहरे का पता लगाने वाले टूल के उदाहरण वाले कोड में, टास्क से मिले नतीजों को दिखाने का तरीका बताया गया है. ज़्यादा जानकारी के लिए, कोड का उदाहरण देखें.