
借助 MediaPipe 手势识别器任务,您可以实时识别手势,并提供识别出的手势结果和检测到的手的特征点。以下说明介绍了如何将手势识别器与 Python 应用搭配使用。
您可以查看Web 演示版,了解此任务的运作方式。如需详细了解此任务的功能、模型和配置选项,请参阅概览。
代码示例
手势识别器的示例代码提供了使用 Python 对此任务的完整实现,供您参考。此代码可帮助您测试此任务,并开始构建自己的手势识别器。您只需使用网络浏览器即可查看、运行和修改手势识别器示例代码。
如果您要为 Raspberry Pi 实现手势识别器,请参阅 Raspberry Pi 示例应用。
设置
本部分介绍了专门针对使用手势识别器设置开发环境和编写项目的关键步骤。如需了解有关设置开发环境以使用 MediaPipe 任务的一般信息(包括平台版本要求),请参阅 Python 设置指南。
软件包
MediaPipe 手势识别器任务需要 mediapipe PyPI 软件包。您可以使用以下命令安装和导入这些依赖项:
$ python -m pip install mediapipe
导入
导入以下类以访问手势识别器任务函数:
import mediapipe as mp
from mediapipe.tasks import python
from mediapipe.tasks.python import vision
型号
MediaPipe 手势识别器任务需要与此任务兼容的训练模型软件包。如需详细了解适用于手势识别器的可用训练模型,请参阅任务概览的“模型”部分。
选择并下载模型,然后将其存储在本地目录中:
model_path = '/absolute/path/to/gesture_recognizer.task'
在“Model Name”(模型名称)参数中指定模型的路径,如下所示:
base_options = BaseOptions(model_asset_path=model_path)
创建任务
MediaPipe 手势识别器任务使用 create_from_options 函数来设置任务。create_from_options 函数接受要处理的配置选项的值。如需详细了解配置选项,请参阅配置选项。
以下代码演示了如何构建和配置此任务。
这些示例还展示了图片、视频文件和直播视频流的任务构建变体。
Image
import mediapipe as mp

BaseOptions = mp.tasks.BaseOptions
GestureRecognizer = mp.tasks.vision.GestureRecognizer
GestureRecognizerOptions = mp.tasks.vision.GestureRecognizerOptions
VisionRunningMode = mp.tasks.vision.RunningMode

# Create a gesture recognizer instance with the image mode:
options = GestureRecognizerOptions(
    base_options=BaseOptions(model_asset_path='/path/to/model.task'),
    running_mode=VisionRunningMode.IMAGE)
with GestureRecognizer.create_from_options(options) as recognizer:
  # The detector is initialized. Use it here.
  # ...
视频
import mediapipe as mp

BaseOptions = mp.tasks.BaseOptions
GestureRecognizer = mp.tasks.vision.GestureRecognizer
GestureRecognizerOptions = mp.tasks.vision.GestureRecognizerOptions
VisionRunningMode = mp.tasks.vision.RunningMode

# Create a gesture recognizer instance with the video mode:
options = GestureRecognizerOptions(
    base_options=BaseOptions(model_asset_path='/path/to/model.task'),
    running_mode=VisionRunningMode.VIDEO)
with GestureRecognizer.create_from_options(options) as recognizer:
  # The detector is initialized. Use it here.
  # ...
直播
import mediapipe as mp

BaseOptions = mp.tasks.BaseOptions
GestureRecognizer = mp.tasks.vision.GestureRecognizer
GestureRecognizerOptions = mp.tasks.vision.GestureRecognizerOptions
GestureRecognizerResult = mp.tasks.vision.GestureRecognizerResult
VisionRunningMode = mp.tasks.vision.RunningMode

# Create a gesture recognizer instance with the live stream mode:
def print_result(result: GestureRecognizerResult, output_image: mp.Image, timestamp_ms: int):
    print('gesture recognition result: {}'.format(result))

options = GestureRecognizerOptions(
    base_options=BaseOptions(model_asset_path='/path/to/model.task'),
    running_mode=VisionRunningMode.LIVE_STREAM,
    result_callback=print_result)
with GestureRecognizer.create_from_options(options) as recognizer:
  # The detector is initialized. Use it here.
  # ...
配置选项
此任务针对 Python 应用提供了以下配置选项:
| 选项名称 | 说明 | 值范围 | 默认值 | |
|---|---|---|---|---|
running_mode |
设置任务的运行模式。共有三种模式: IMAGE:适用于单张图片输入的模式。 视频:视频的解码帧的模式。 LIVE_STREAM:输入数据(例如来自摄像头)的直播模式。在此模式下,必须调用 resultListener 以设置监听器以异步接收结果。 |
{IMAGE, VIDEO, LIVE_STREAM} |
IMAGE |
|
num_hands |
GestureRecognizer 可以检测的手数上限。
|
Any integer > 0 |
1 |
|
min_hand_detection_confidence |
在手掌检测模型中,手检测被视为成功所需的最低置信度得分。 | 0.0 - 1.0 |
0.5 |
|
min_hand_presence_confidence |
手部地标检测模型中手部存在得分的最小置信度得分。在手势识别器的视频模式和直播模式下,如果手部地标模型的手部存在置信度分数低于此阈值,则会触发手掌检测模型。否则,系统会使用轻量级手部跟踪算法来确定手部的位置,以便进行后续地标检测。 | 0.0 - 1.0 |
0.5 |
|
min_tracking_confidence |
手部跟踪被视为成功所需的最低置信度得分。这是当前帧和上一帧中手部之间的边界框 IoU 阈值。在手势识别器的视频模式和流模式下,如果跟踪失败,手势识别器会触发手部检测。否则,系统会跳过手部检测。 | 0.0 - 1.0 |
0.5 |
|
canned_gestures_classifier_options |
用于配置预设手势分类器行为的选项。预设手势为 ["None", "Closed_Fist", "Open_Palm", "Pointing_Up", "Thumb_Down", "Thumb_Up", "Victory", "ILoveYou"] |
|
|
|
custom_gestures_classifier_options |
用于配置自定义手势分类器行为的选项。 |
|
|
|
result_callback |
设置结果监听器,以便在手势识别器处于实时流模式时异步接收分类结果。
仅当运行模式设置为 LIVE_STREAM 时才能使用 |
ResultListener |
不适用 | 不适用 |
准备数据
将输入准备为图片文件或 NumPy 数组,然后将其转换为 mediapipe.Image 对象。如果输入是视频文件或来自摄像头的实时流,您可以使用 OpenCV 等外部库将输入帧加载为 numpy 数组。
Image
import mediapipe as mp

# Load the input image from an image file.
mp_image = mp.Image.create_from_file('/path/to/image')

# Load the input image from a numpy array.
mp_image = mp.Image(image_format=mp.ImageFormat.SRGB, data=numpy_image)
视频
import mediapipe as mp

# Use OpenCV’s VideoCapture to load the input video.

# Load the frame rate of the video using OpenCV’s CV_CAP_PROP_FPS
# You’ll need it to calculate the timestamp for each frame.

# Loop through each frame in the video using VideoCapture#read()

# Convert the frame received from OpenCV to a MediaPipe’s Image object.
mp_image = mp.Image(image_format=mp.ImageFormat.SRGB, data=numpy_frame_from_opencv)
直播
import mediapipe as mp

# Use OpenCV’s VideoCapture to start capturing from the webcam.

# Create a loop to read the latest frame from the camera using VideoCapture#read()

# Convert the frame received from OpenCV to a MediaPipe’s Image object.
mp_image = mp.Image(image_format=mp.ImageFormat.SRGB, data=numpy_frame_from_opencv)
运行任务
手势识别器使用 recognize、recognize_for_video 和 recognize_async 函数来触发推理。对于手势识别,这涉及预处理输入数据、检测图片中的手、检测手部地标,以及根据地标识别手势。
以下代码演示了如何使用任务模型执行处理。
Image
# Perform gesture recognition on the provided single image.
# The gesture recognizer must be created with the image mode.
gesture_recognition_result = recognizer.recognize(mp_image)
视频
# Perform gesture recognition on the provided single image.
# The gesture recognizer must be created with the video mode.
gesture_recognition_result = recognizer.recognize_for_video(mp_image, frame_timestamp_ms)
直播
# Send live image data to perform gesture recognition.
# The results are accessible via the `result_callback` provided in
# the `GestureRecognizerOptions` object.
# The gesture recognizer must be created with the live stream mode.
recognizer.recognize_async(mp_image, frame_timestamp_ms)
请注意以下几点:
- 在视频模式或直播模式下运行时,您还必须向手势识别器任务提供输入帧的时间戳。
- 在图片或视频模型中运行时,手势识别器任务会阻塞当前线程,直到其处理完输入图片或帧。
- 在直播模式下运行时,手势识别器任务不会阻塞当前线程,而是会立即返回。每当它处理完输入帧后,都会调用其结果监听器并传递识别结果。如果在手势识别器任务忙于处理其他帧时调用识别函数,该任务将忽略新的输入帧。
如需查看在图片上运行手势识别器的完整示例,请参阅代码示例了解详情。
处理和显示结果
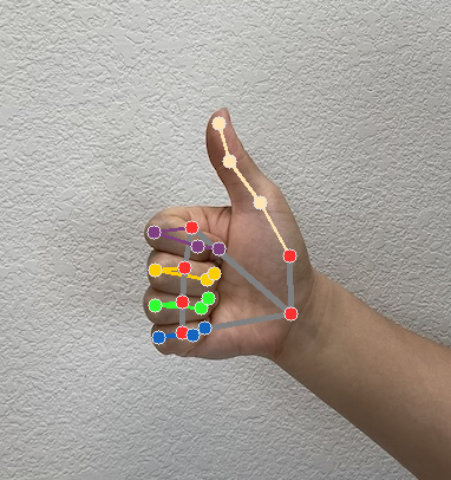
手势识别器会为每次运行的识别生成一个手势检测结果对象。结果对象包含图片坐标中的手部特征点、世界坐标中的手部特征点、手的左右手性以及检测到的手的手势类别。
以下是此任务的输出数据示例:
生成的 GestureRecognizerResult 包含四个组件,每个组件都是一个数组,其中每个元素都包含单个检测到的手的检测结果。
惯用手
惯用手表示检测到的手是左手还是右手。
手势
检测到的手的已识别手势类别。
地标
手部地标共有 21 个,每个地标由
x、y和z坐标组成。x和y坐标分别按图片宽度和高度归一化为 [0.0, 1.0]。z坐标表示地标深度,其中手腕处的深度为原点。值越小,地标离相机越近。z的大小与x大致相同。世界地标
21 个手部特征点也以世界坐标表示。每个地标均由
x、y和z组成,表示以米为单位的真实 3D 坐标,其原点位于手的几何中心。
GestureRecognizerResult:
  Handedness:
    Categories #0:
      index        : 0
      score        : 0.98396
      categoryName : Left
  Gestures:
    Categories #0:
      score        : 0.76893
      categoryName : Thumb_Up
  Landmarks:
    Landmark #0:
      x            : 0.638852
      y            : 0.671197
      z            : -3.41E-7
    Landmark #1:
      x            : 0.634599
      y            : 0.536441
      z            : -0.06984
    ... (21 landmarks for a hand)
  WorldLandmarks:
    Landmark #0:
      x            : 0.067485
      y            : 0.031084
      z            : 0.055223
    Landmark #1:
      x            : 0.063209
      y            : -0.00382
      z            : 0.020920
    ... (21 world landmarks for a hand)
以下图片显示了任务输出的可视化结果:
手势识别器示例代码演示了如何显示从任务返回的识别结果,如需了解详情,请参阅代码示例。